How to Turn Photos Into Comic Books

The Cartoon It Team
Editor @ Cartoon It
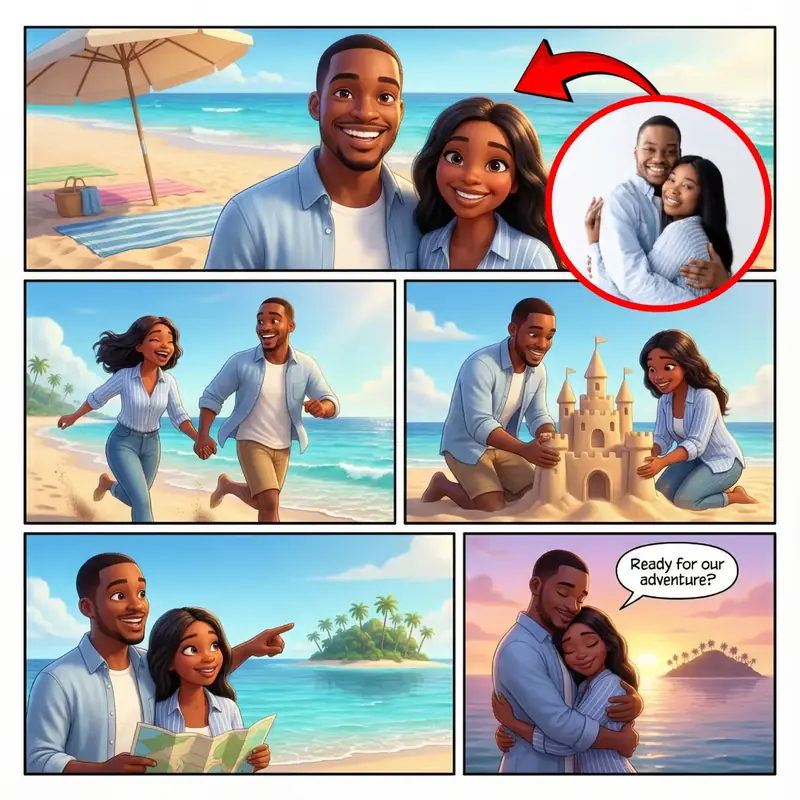
You do not need to draw to make a comic any more. But most people's first attempt comes back looking like a filtered photo rather than a comic page, and that is almost always down to three or four choices made before they hit generate. This guide walks through every one of them.
What actually happens when you upload a photo
It helps to know that two different models do the work, one after the other. The first is a writer. It looks at your photos, works out who is in them, and plans a story: how many pages, what happens on each one, which characters appear in which panel, and what every caption and speech balloon says.
The second is an artist. It draws each page from that plan, with your photos attached as the reference for what everyone looks like. It also letters the page itself, which is why the balloons have tails pointing at whoever is speaking rather than floating boxes pasted over the art.
This matters practically: a weak result is usually a writing problem, not a drawing problem. If the story is vague, the art has nothing to hold onto.
Step 1: pick the right photo
The photo is the single biggest lever you have. The artist is told to match the face, hair, age, build, height and skin tone from it exactly, so anything ambiguous in the photo becomes ambiguous in the comic.
- Front-facing beats angled. A face turned three-quarters or more gives the model less to work with, and the likeness drifts.
- Even light beats dramatic light. Window light is ideal. Hard shadows across half a face get baked into the drawing.
- Sharp beats large. A crisp 1000px photo works better than a blurry 4000px one. Motion blur is the hardest thing to recover from.
- Faces should be a reasonable size in frame. If a face is a tiny part of a wide landscape shot, there is not much detail to copy.
- Simple backgrounds help, but matter far less than the face. The scene gets redrawn from the story anyway.
Step 2: understand how the cast is decided
This is the step people get wrong most often. The number of characters in your comic is not the number of photos you upload. The writer counts distinct people by face.
Upload three photos of yourself and you get one character, seen from three angles — which usually improves the likeness. Upload one photo of two people and you get two characters. The photos always outrank the theme you picked: choosing a romantic story with a single-person photo gives you a solo story about that person, not an invented partner.
PRO TIP
For the best likeness of one person, upload two or three different photos of them rather than one. More angles, same face — the model gets a fuller picture of the features it has to keep consistent across every page.
Step 3: choose a style that fits the subject
Style is not just decoration; each one flatters different material.
- Dreamy anime — hand-painted watercolour backgrounds and soft natural light. Best for gentle, nostalgic or outdoor stories.
- Manga — strictly black and white, ink hatching and screentone. Excellent for action and drama; it strips out colour so expression and composition carry the scene. Seeturning a photo into manga.
- Heroic style — cinematic superhero comic, dramatic lighting, bold ink. Best for movement: jumping, running, action poses.
- 3D pix art — modern animated-feature look, large expressive eyes, soft volumetric light. Best for children, pets and close-up portraits.
- Classic comic book — halftone dots and a vintage printed texture. Best for retro or comedic material.
Step 4: mood and theme change the story, not the palette
Mood is an instruction to the writer, not a colour filter. A heroic mood makes the plot about a challenge overcome; a funny mood builds toward a joke; an emotional one builds toward a moment of feeling. Pick the mood that matches the story you want told, not the colours you want to see.
The theme — couples, kids, family — sets who the story is written for, not who is in it. A story written for a young reader can absolutely star an adult; the people come from the photos.
Step 5: pick the right length
- Poster — one vertical 9:16 image with a comic title across the top. No panels, no dialogue. Made for phone wallpapers and social.
- One page — a complete little story: setup, complication, turn, resolution, all on one page of three to five panels.
- Two or three pages — room for a real arc. Two pages set up and resolve; three give you a proper beginning, middle and end.
- Graphic Novel — three story pages plus a cover. The cover is drawn last from the finished story, so it summarises what actually happens rather than being a generic hero pose.
Step 6: write a plot line that gives the writer something to hold
You can leave the plot blank and something will be invented, but one sentence of context changes the result more than any other setting. The useful shape is who, doing what, where, and what goes wrong.
- Weak: "a fun adventure"
- Better: "exploring a jungle temple"
- Strong: "exploring a jungle temple and finding the door is locked, until a parrot shows the way in"
The third gives the writer a problem and a solution, which is what a story actually is. Names help too — put real names in and they end up in the dialogue.
What a finished page looks like
Each page carries three to five panels in a varied layout — a wide establishing panel, a row of narrower beats, a wide closer — rather than the same grid every time. Narration appears in rectangular caption boxes; speech sits in balloons with tails. On a multi-page story the same outfit, face and proportions carry from page to page, and the last page resolves the story rather than ending on a cliffhanger.
Printing and sharing
Paid downloads include the PNG pages and an A4 PDF. Pages are around 1200 pixels tall, which is sharp at postcard and A5 sizes and still looks good framed at A4. For gifts, glossy photo paper suits the colour styles and matte cardstock suits manga, which is closer to how those pages are actually printed.
Common problems, and what causes them
- The face does not look like me. Usually an angled, blurry or badly lit source photo. Try a front-facing shot in even light, and upload two or three of them.
- There is an extra person. Check whether a second face is visible in any uploaded photo, including in the background.
- The story is generic. The plot box was empty or vague. One specific sentence fixes this more reliably than changing style or mood.
- The style is not what I expected. Manga is deliberately black and white; if you wanted colour, pick one of the other four.
Try it before you pay
You can generate and look at a page before spending anything — the preview is free and no account is needed. Paid downloads start at $3.99 as a one-time purchase, with no subscription.
Turn YOUR Photos
Into Comics
Join 1,500+ storytellers making manga, superhero, and 3D animated stories in seconds.
Start for Free • No Credit Card Required